With Salesforce, every department in your company can benefit from a shared view of all your customers. This allows for an easy-to-use solution to the cumbersome task of storing and accessing customer data. To start, we will explain the two most common types of objects supported in Salesforce, including their specific functionalities and how to create them.
Objects:
Objects are database tables that allow you to store and access the data of the organization. There are two common types of objects in Salesforce:
- Standard Object
- Custom Object
Standard Object:
Salesforce provides some standard objects through salesforce.com. These objects can be used to customize your requirements, and though they cannot be edited with the standard fields, you can add more fields for an additional purpose. Example: Account, Contact, Opportunity, Lead, Campaign – these are the standard objects available in Salesforce.
Custom Object:
With a custom object, you can store the information that’s specific to your company or industry, and it can extend your organization data.
The steps for creating a custom object are as follows:
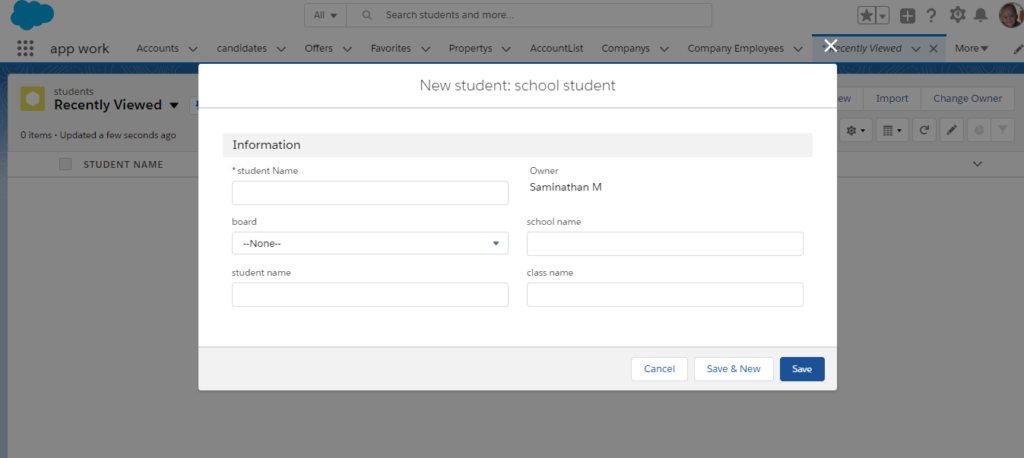
First, you must click the ‘Object Manager’ button on the home page at the top left side. The object manager page will be opened within the same page, where you can then click the ‘Create’ button on the top right side to open the custom object. In that new page, you can fill out the label name for the custom object called “Student”, and then you can click the ‘Save’ button to save the custom object.
 Data Types (Fields):
Data types are also called ‘Fields’. In the fields, you can apply the type of data that is used in the creation of an object. In the data types, you can create the fields you want. For example, if you want to create an object called ‘Student’, then the data types will be as follows:
| Data Type | |
|---|---|
| Student name | ‘Text’ |
| Date of birth | ‘Date’ |
| Gender | ‘Picklist’ |
| Mark | ‘Number’ |
| Contact | ‘Phone’ |
After creating the object for creating data types, follow the steps below:
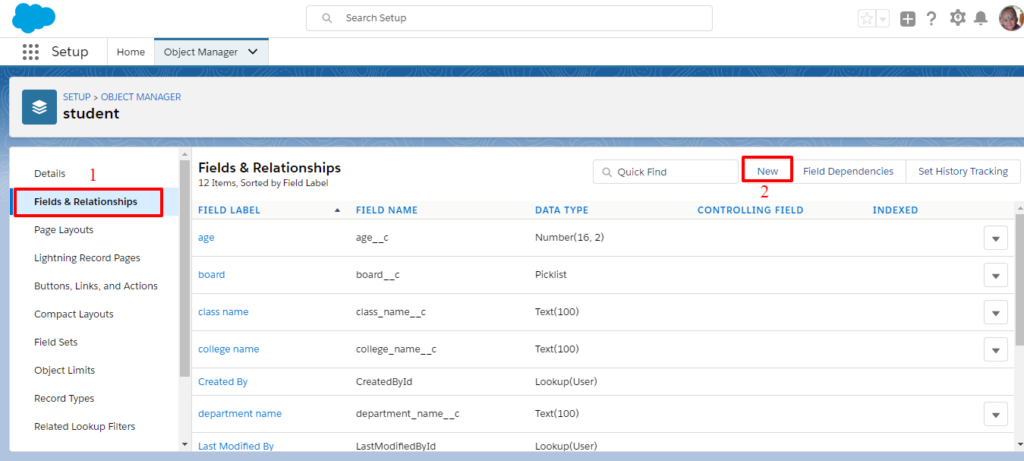
- After saving the object page, a new page will be opened where you will have to create fields or data types.
- In that page, you must click the “Fields and Relationship” button on the left side column and the fields page will be opened, then click on the new button on the top right corner.
- A new custom field page will be opened. In that page, you must scroll down and click “Text” for the student name, and then click the “Next” button on the bottom right corner.
- A new page will be opened on that page, where you will have to fill in the Field Label name called “Student Name” and the length (which is nothing but a maximum length for a text field). Then, click “Next”.
- A new page to Establish Field-level Security will be opened, where you must click on both the visible and read-only columns, and then click the “Next” button.
- An Add to Page Layouts page will be opened where you must click the “Save” button.
Finally, you will have to create a data type called “Student Name” successfully. Just follow the above steps to create other data types called Date of Birth, Gender, Mark, and Contact.
Tabs:
Tabs are also called as ‘Custom Tabs’. A custom tab is a way to read the object’s records. Tabs are mandatory to use while creating an object. After creating the data types for creating tabs, follow the steps below:
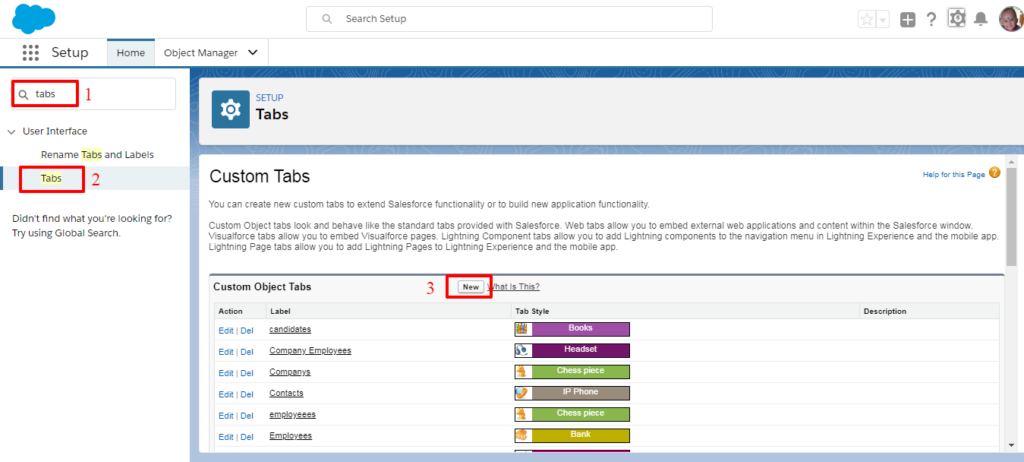
- You can find the setup option by clicking the settings icon on the top right corner.
- After clicking the setup option, a new page will be opened.
- In that page, you can search and click on the ‘Tabs’ button in the quick find box at the left side corner.
- After clicking the ‘Tabs’ button, a new tab page will be opened. In that page, you can click the ‘New’ button and the details page will be opened. In that page, you can select the object and object style.
- Once you have created an object, the data types and tabs will then automatically show the particular object name in the object column. An object style simply allows you to provide a style for that particular object.
- After selecting the object and tab style, a new page will be opened. In that page, you can select the tab visibility for each profile.
- Then, click the ‘Next’ button and a new page will be opened. In that page, select the ‘Include Tab’ option, and then save the tab.
 Record:
A record is also known as data. It contains the value of the fields. If you have one custom object, then records are mandatory for that object. The steps to provide values to the records are as follows:
- After creating the Tabs, it will be saved in the back end and a new page will be opened.
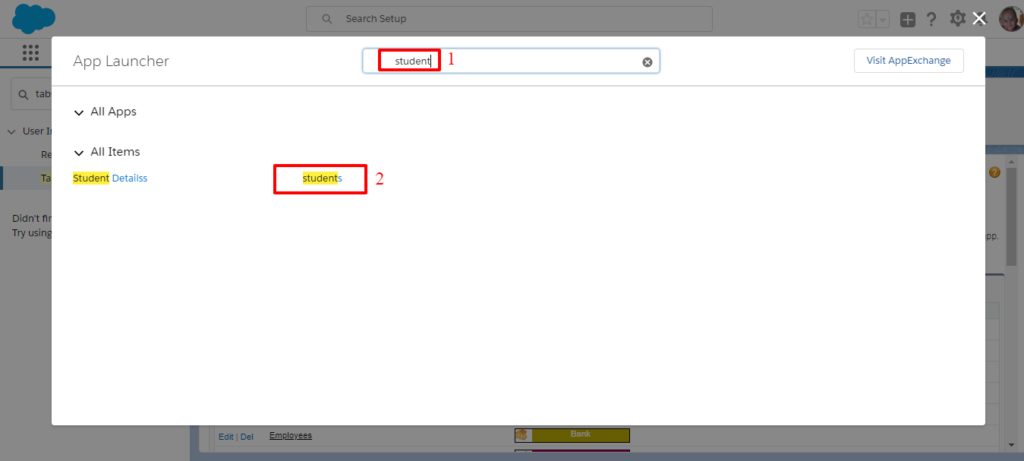
- In that page you can click the ‘App Launcher’ button, “ICON” on the left side corner.
- After selecting the App Launcher, the new page will be opened. In that page, you can type the object name called ‘Student’ in the ‘search apps’ box at the top of the page, and then click to open the object.
 The record page will be opened and you can click the ‘New’ button to give values to the fields.
- If you want to do so for more than one record, you will have to select the ‘New’ button on the right side corner.
 List Views:
List views are a great way to sort, prioritize, and analyze the records that are most important to creating multiple objects and bulk objects. Similarly, you will have to create a custom object for ‘Students Details’. To create a list view, follow the steps below.
- After you have created the custom object, you can open the record page of the custom object page. Click ‘Icon’, the setup button, type your custom object name, and the record page will be opened. In that page, it will open as seen below.
Before Creating the List View:
 In that page, you can click ‘List View Control’ (setting logo) on the top right corner. Clicking the ‘new’ button will open a new list view page.
- In that page, you can fill in the list name and list API name, and then click to save the new list view.
- Once you have created a new list view, you will have to provide the selected fields to display, which will display the required fields.
- In that page, you can click ‘List View Control’ (settings logo) at the top right to open the selected fields, and to display whatever you want.
- After you have created a list view, you can click the list view name inside the recently viewed, which is on the top left corner.
After Creating the List View:
 Validation Rules:
This is one of the automation processes in salesforce, and it is used to validate the records before saving them. Validation rules include an error message displayed to the user when the rule returns a value of ‘False’. Validation rules in salesforce are meant to enforce integrity constraints (conditions) against the data. Here, you can give conditions in the formula editor to meet your requirements. If one validation rule fails, Salesforce continues to check another validation rule contained in the field, or record, and displays an appropriate error message at that field, or above the record.
- Field Restrictions: Validation rule formulas don’t refer to the following fields in Salesforce:
- Addresses
- First name and Last name
- Picklist and lookup
- Merge fields for auto numbers
- Compound address fields (Mailing address)
The validation page usually opens like below.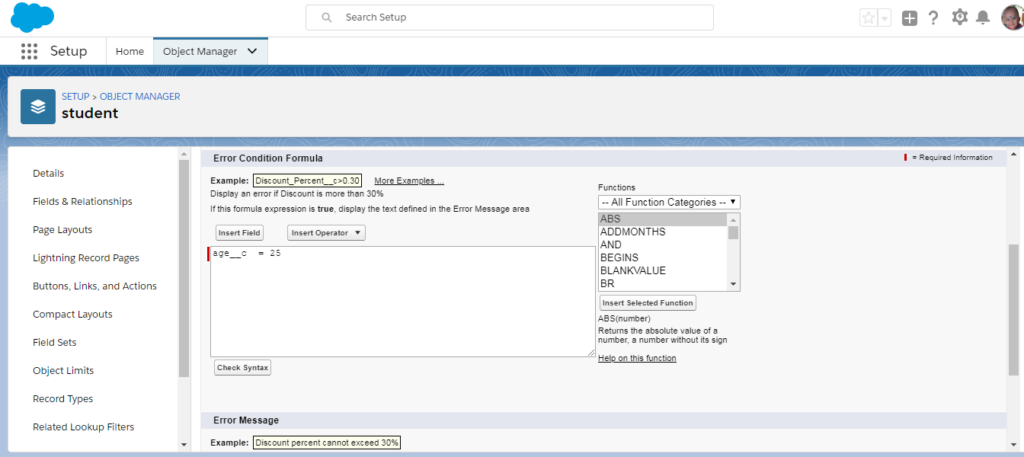
To create validation rules, you must follow the steps below.
- After you have created a custom object, you can open that object on the object manager and click to open your created object.
- In that page, you can click to open validation rules on the bottom left side, scroll down and then the validation page will be opened.
- In that page, you can click the ‘New’ button at the top right corner, then the validation page will be opened for your object.
- You can fill in the Rule Name, Error Condition Formula, Error Message, and Error Location for your field.
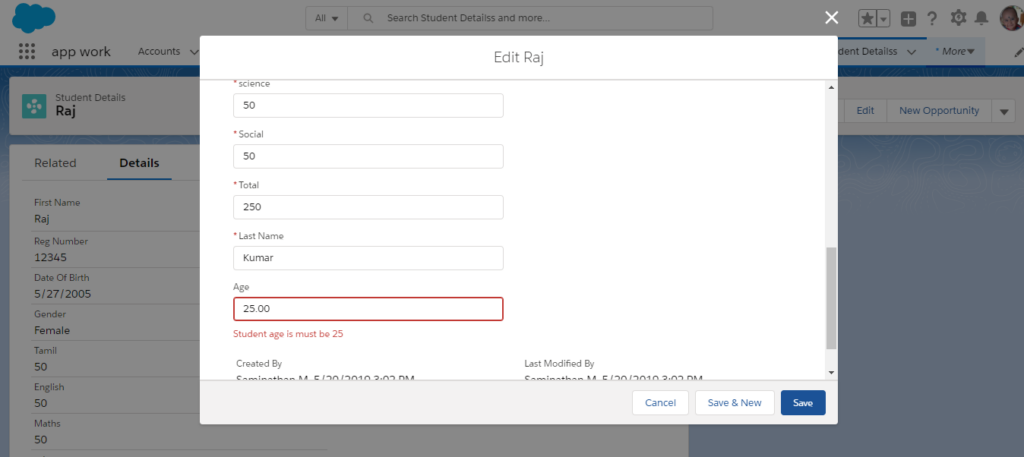
Example: If the student’s age is equal to 25, then it will show an error message.
- Firstly, by clicking on ‘Insert Field’, you can select the field name and insert it. Secondly, by selecting ‘Insert Operator’, you can select the required type of operator and insert it.
- After inserting an error condition formula, you must click ‘Check Syntax’. If there is no error, then you can write an error message in the column for the error message that is displayed to you.
Example: If the student’s age is not equal to 25.
- Here, after you select the error location, this error message will either appear at the top of the page or below a specific page of the field.
- Finally, click to save the validation rule. Here, after you give the record value, if the student’s age is equal to 25, then it will show the error.
The error page will usually open up like the one shown on the image below.