Internet shopping has grown exponentially and as consumers have become more and more comfortable with security and paying online, a growing number of them have migrated from bricks to clicks. This inflation in e-commerce has caused retailers to establish their realms online. Although creating an online presence has its perks, it can be daunting and overwhelming for sellers beginning to explore this niche. It takes more than just an idea or a brand name to build a successful e-commerce business. If you don’t build on the right platform, to begin with, even the best business can fail miserably. Shopify has made it easier than ever to set-up a business and start selling online. With more than 1 Million active websites, Shopify is highly recommended for any e-commerce store.
Contents
Setting up a Shopify Store
The following steps will guide you to develop a Shopify store from scratch.
Account Setup
To set up a trial account:
- Head over to https://www.shopify.com/ and click on ‘Start Free Trial’.
- Sign-up using your Email Address, Password and Store name, and click ‘Create your store’.
 3. On the ‘Tell us a little about yourself’ page, answer the questions about your store and click Next.
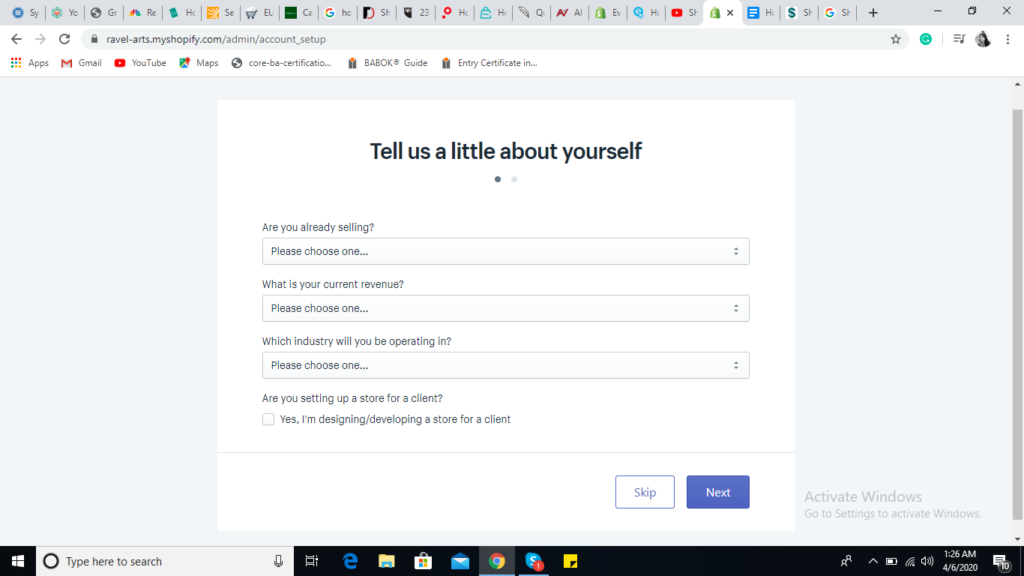 4. The next page will prompt for your primary contact information. After entering all the data click ‘Enter my store’.
 5. Now you will be redirected to your stores’ primary dashboard.
Store Setup:
In this step you can set up and design your store.
Customize Theme
- To customize your store’s theme, click on the ‘Customize Theme’ button on the homepage.
- Once on the Theme page, you can choose to apply a ‘Free theme’, a ‘Paid Theme’ from the Shopify Theme Store, upload a Shopify compatible theme or customize the current theme. The ‘Debut’ theme is the default theme chosen by Shopify.
 3. Click on ‘Explore free themes’ to choose a free theme.
 4. Click on a theme, choose the style you want from those available and click ‘Add to theme Library’.
 5. To replace the current theme with the ‘Simple Theme’, click on the ‘Actions’ drop-down menu under the ‘Simple Theme’ and select ‘Publish’.
 6. The theme is now active and is ready for further customization. Click on ‘Customize’ next to the ‘Actions’ button.7. From here you can modify the theme of your website, add photos, logos, text and additional features like blogs.
 Add ProductsTo add products to your store, click on the ‘Add Products’ button on the homepage.
- Title: Give your product a title. Avoid generic terms and make them descriptive.
- Description: To help customers find your product/website, you will need an SEO-friendly description with appropriate keywords.
- Media: Upload images or videos of your product. They are what make or break the opinion of your product.
- Pricing: Enter the amount you are charging for the item. If the product is on sale, enter the original price under ‘Compare at price’ and the lower price under ‘Price’. ‘Cost per item’ is for personal use to track margin.
- Inventory: Enter the SKU (Stock Keeping Unit), the Barcode of the item and number of items in stock when there is more than one of the same product.
- Shipping: This section should only be filled if the item is a physical product. Enter the weight and customs information.
- Variants: If the product comes in different colors or sizes, this is where to enter those options.
- Search engine listing preview: Here you can preview how your page will look like on Google and other search engines. Add a title, description, and URL.
Discount
Create discounts for customers to use on purchased products. Formerly, this feature was only available to Shopify Plus members but now is included in all Shopify plans. Shopify provides two ways to apply discounts.
(a) Discount Codes: These codes are applied at the checkout.
(i) Click on ‘Discounts’ from the left panel and select ‘Create Discount Code’.
(ii) Enter a discount code customers can use during checkout.
(iii) Choose a type of discount: Percentage, Fixed Amount, Free Shipping, Buy X get Y. Enter the discount value.(iv) Specify who this discount applies to, the minimum requirements to use this discount code, customer eligibility, and usage limits.
(v) The discount can be scheduled for a certain period of time. The date and time can be specified in the ‘Active Dates’ section.
(b) Automatic Discount: These discounts apply automatically at the checkout.
(i) Click on ‘Discounts’ from the left panel and select ‘Create Automatic Discounts’.
(ii) Enter a title for the Automatic discount.
(iii) Choose a type of discount: Percentage, Fixed Amount, Buy X get Y. Enter the discount value.
(iv) Specify who this discount applies to and the minimum requirements.
(v) The discount can be scheduled for a certain period of time. The date and time can be specified in the ‘Active Dates’ section.
Payments
Go to ‘Settings’ then click on ‘Payment Providers’ to set up payment options. By default, the store accepts Paypal via the Paypal express checkout. To accept credit card payments you must setup Shopify Payment or a third-party provider. There are options to set up Alternative Payment as well as Manual Payments. Manual Payments proceed outside your Shopify store, and the order must be approved for payment. Some manual payment methods are Bank Deposit, Money Order, and Cash on Delivery (COD).
Shipping
Go to ‘Settings’ then click on ‘Shipping’ to modify your shipping services. Here you can verify your shipping origin address, add shipping zones and manage shipping rates for domestic and international orders.TaxesGo to ‘Settings’ then click on ‘Taxes’ to set up how the store handles taxes. This page shows tax rates of regions in your shipping profile. It also shows how tax is calculated and displayed in the store and lets you manage the tax applied.
Checkout
Go to ‘Settings’ then click on ‘Checkout’ to set up your checkout section.
- Customer Accounts: This feature gives you the option to select whether the customer requires an account or not when they checkout.
- Customer Contact: Customers will be required to enter their contact information (phone number or email address) to checkout and receive shipping updates. Here you can choose the contact method required.
- Form Options: This section displays additional information that may be required at the time of checkout. You can select these options to be Required, Optional, or Hidden.
- Order Processing: This feature specifies how the store should respond during checkout and order events like ‘While the customer is checking out’, ‘After an order has been paid’, and ‘After an order has been fulfilled or paid’.
- Email marketing: Specify whether to show the sign-up option at checkout.
- Checkout Language: You can manage the language of the checkout page.
You won’t be able to accept orders while on trial, a Shopify plan must be purchased to do so. With these steps, the store is now ready to go online. Shopify’s 14-day free trial allows you to get started with your online store.No matter what point you are at with your business, Shopify has a plan ready to help scale your business. Our team of Shopify experts can help you with the entire process to get your business up and running.